The Warm Up: Are you doing it wrong?

Warming up the right way keeps you exercising longer even into old age.

Why bother warming up? Is it worth your time?

Spoiler alert — Yes! And, there’s a good chance you’re doing it wrong. More on that later.

Perhaps most importantly, warming up will help you avoid injury. It will also increase your performance and the quality of your workout. 

What is the purpose of a warm up?

Most exercisers are not aware that warming up is important for the nervous system. It’s important to get your body ready to recruit all the muscle fibers that it’s going to need to use.

As suggested in the name, warming up increases your core temperature. This is useful because the fascia surrounding your muscles and other connective tissues like tendons have a thixotropic property. This means the tissues change with heat. They get less stiff and this allows for more elasticity and glide which means less chance of tearing. 

How to warm up:

Be specific

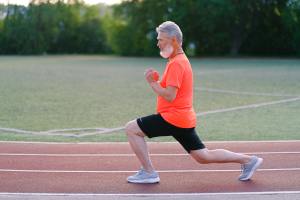
The movements used in your warm up should be specific to what you are about to do. They should incorporate all the joints and muscles you will be putting heavy demand on. That means a cardio warm up on the treadmill is not relevant for weightlifting. However, a set of bodyweight squats would be a good start before doing a goblet squat or back squat. You then would add light weight choosing 30-50% of your normal goblet squat or back squat before moving up to the full weight.

For those sticking with bodyweight squats, you would start by warming up with a scaled down version to start waking up your knees, hips and glute muscles. As an example, you could begin with bridges on the floor or hip thrusts over an exercise ball before moving into your full bodyweight squats.

If you are going to do a full body workout, make sure to choose a few scaled down variations of your exercises before you begin placing full demand on your joints.

Leave fuel in the tank

The warm up should prepare you for your training but not wear you out. Keep these movements at about 50% of your full effort.

Take the time

Allow your body enough time to loosen all your joints and muscles. Each day will be different but warm up long enough to feel your movement is smoother and you feel energized. It’s worth your time — so give it time.

Wellness: Food is medicine

Have you ever had that sleepy post lunchtime droop? Have you ever had that feeling last all day, or for several days? Maybe you are battling an unexplained rash or itchy skin.

When diet is wrong, medicine is of no use. When diet is correct, medicine is of no need. - Ayurvedic proverb

When diet is wrong, medicine is of no use. When diet is correct, medicine is of no need.

– Ayurvedic proverb

Though I make no claims to be a medical professional, as a health coach, I can guide you in the right direction. Here are some important factors to look into when you are having digestive issues or symptoms that are hard to pin down. (lethargy, moodiness, depression, skin rashes etc.)

Histamine Intolerance – An inflammatory situation develops in reaction to out of balance histamine in the body.

Leaky Gut Syndrom –  Inflammation in the digestive system leads to too much gut permeability and

Chemical sensitivities (such as detergents, food additives)

Could it be one or all of these combined. What makes it often so confusing is that multiple causes can add up to overload your system and create symptoms. My health and wellness coach training from the CHEK Institute  describes the phenomenon as your body’s multiple systems having buckets…digestion, sleep, stress, musculoskeletal, respiratory, etc. These systems all work together to withstand daily stressors, pollution, food, life stress but when your buckets get too full and your systems can not clear these stressors quickly enough symptoms start to arise.

Maybe you have a slight sensitivity to detergent or nuts. But you are not really aware of it because nothing very noticeable happens. Everything is fine but you haven’t been sleeping well. Because you haven’t been sleeping well you have late-night snacks. Since you are tired and your digestion is bogged down by late-night snacks you wake up puffy and tired. So there is no way that workout is getting done. Or perhaps you are super A-type personality and you over compensate with too hard of a workout and burn yourself out more. This goes on for 3-6 months and you start seeing skin rashes. You start not being able to eat nuts without getting hives.

Your stress buckets are overflowing and not so fun symptoms are cropping up. If you listen to this message and fix one or two of these areas of your lifestyle, then things start to calm down a bit and maybe they stop being noticeable again. But if you don’t get the memo and compound these issues with more fatigue and physical stressors then symptoms multiply or get worse.

Could it be Histamine intolerance? Are you experiencing adrenal fatigue?

It’s worth investigating.

Cooking Pain Series Part 2:

In part one we covered the important first step of waking your core back up. Now, for part two let’s go directly to the region that is giving you grief.

Back

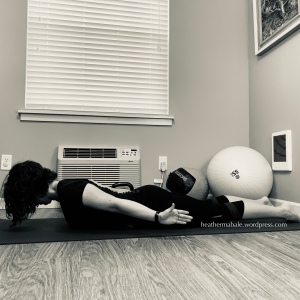
Cobra exercise for strengthening back extension, spinal alignment and posture stamina. Excellent exercise for back pain.

The Cobra exercise is a simple one to do for improving posture and strengthening the back.

Lay face down on a mat and lift your torso up while keeping your hips and feet on the mat. If you do not have any back pain then keep your glutes relaxed so that the back will do all of the work. Your arms will stay by your sides with your palms externally rotated away from your hips with your thumb reaching toward the ceiling. Keep your chin tucked so that your neck is long.

Hold for a minimum of 30 seconds for three sets. You can work up to one minute for three sets — eventually being able to hold for a full three minutes. Rest for half the time of your hold.

For example: 30 secs x 3 sets, rest 15 secs in-between sets. (for a 1 min hold rest 30 secs)

Hip

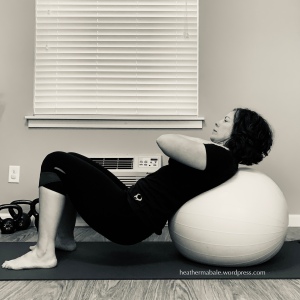
Hip thrust exercise strengthens glute muscles and improves hip extension. Excellent exercise for healthy hips and to eliminate hip pain.

Hip Thrusts are a great first step to strengthen glutes to get you out of pain from hip imbalances. Using an exercise ball that is the right size for your height lay over the ball with your shoulders supported and your feet hip distance apart and your toes pointing forward. Drop your hips down.

From the bottom position bring your hips up all the way to the end range and repeat for 16-20 times for 1-3 sets. Work up to three sets as you get stronger. Rest in-between sets for 30 seconds. During this exercise keep your head and shoulders supported on the ball.

Knee

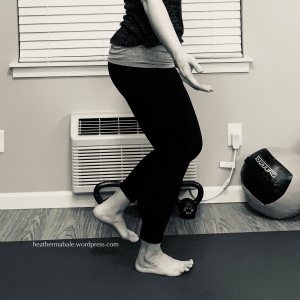
Tripod foot arch exercise builds foot strength and balance. Tripod is a great exercise for runners and also for stability.

This exercise will improve your balance and strengthen your foot arch to counteract hip and foot weaknesses that lead to knee pain. Lift your toes, bend your knee about 15 degrees and keep your hips level as you bring one foot up to balance on one leg. Hold this for a minimum of 30 seconds and work up to three minutes.

Neck

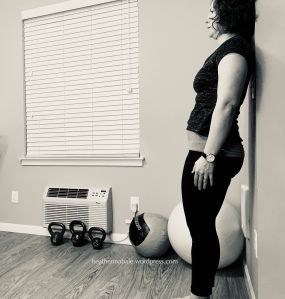
The wall lean exercise strengthens posture and all of the neck extensors to create better alignment.

Align your toes forward, hips level and tuck your ribcage in so it does not pop out. Keep your chin tucked in so your spine is in alignment. Walk out from the wall keeping in good alignment so you are only supporting your weight by pushing your head back into the wall behind you. This will strengthen your neck and back in a good postural alignment. Draw in your belly button into your spine so your abdominals are active in supporting you. Hold this position for 30 seconds at a time until you are strong enough to hold for one minute. Eventually you will work up to holding for two to three minutes.

Try incorporating these exercises every other day to give your body time to rest in-between. You can even start with one of each above everyday so that you also strengthen your habit yet are not working the same muscles each day. You should start to feel better quickly but will begin to notice real changes around four to eight weeks. Give it a go and tell me how you like it.

Cooking Pain Series Part 1

Holiday Pain in the you know what. Does holiday cooking leave you in pain?

Holiday cooking can be fun but it can also wreak havoc on your joints. More time spent in the kitchen, often hours, leads to sore joints all over. Holiday home chefs like you often complain of sore hips, knees, backs, and yes — a pain in the neck. In this series of posts, I’ll lead you through some solutions to get you out of pain now and take you through some tactics to prevent it from happening again. We’ll also fill in some details on why this happens.

PROBLEM

Back
Low back spasm or soreness from all that mixing of cookie dough.

Hip
Hours of shifting hips and pivoting between counter tops and cooking stations leads to sharp pain in the side of the hip or deep in the rear.

Knee
Standing on a hard kitchen floor travels up from ankle to knee causing pain typically above the knee cap towards the midline of the body.

Neck
Mixing up ingredients and reading through recipes has lead to a stiff neck. Perhaps even headaches.

SOLUTION:
This is the first and most important step out of a sequence of steps I will introduce in a series of posts. It applies to all the above joint maladies.

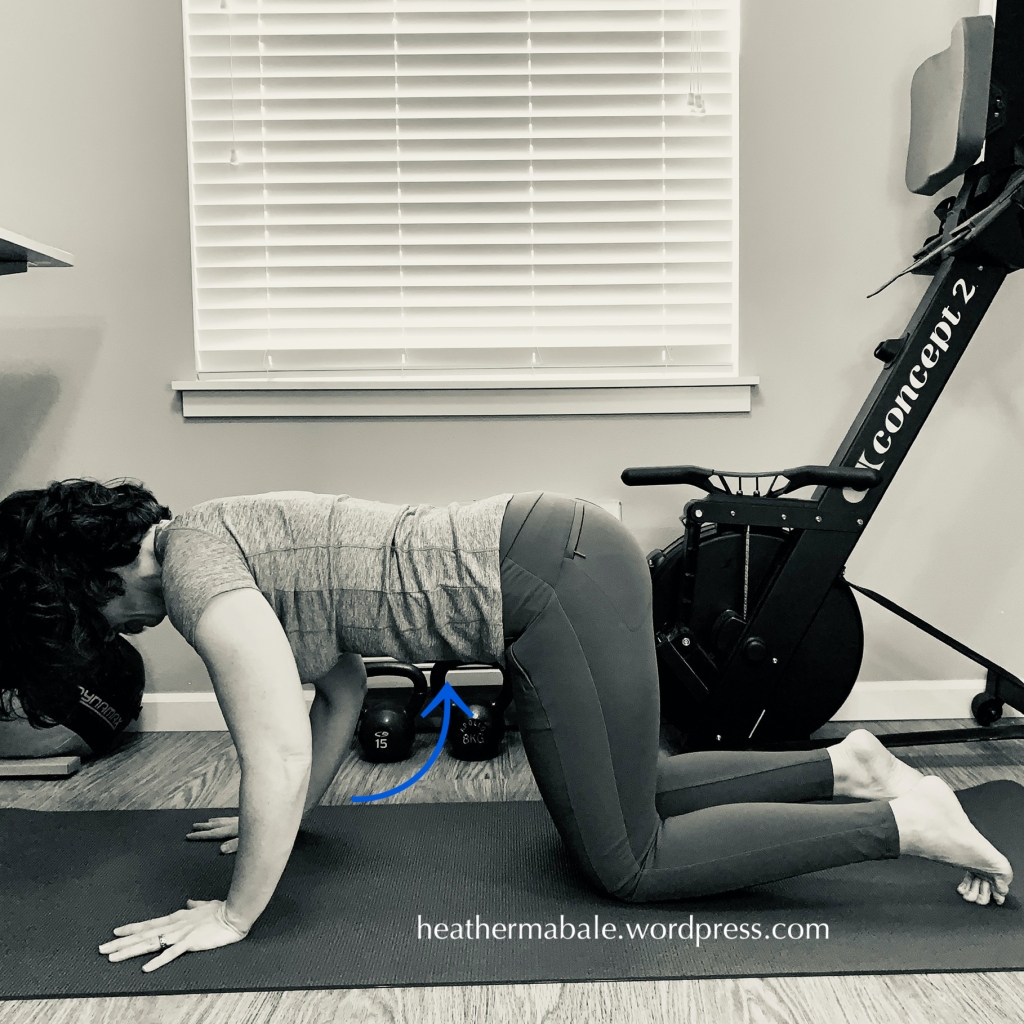
Belly Breath in Table Top (also known as Tummy Vacuum)

How to set up in position:

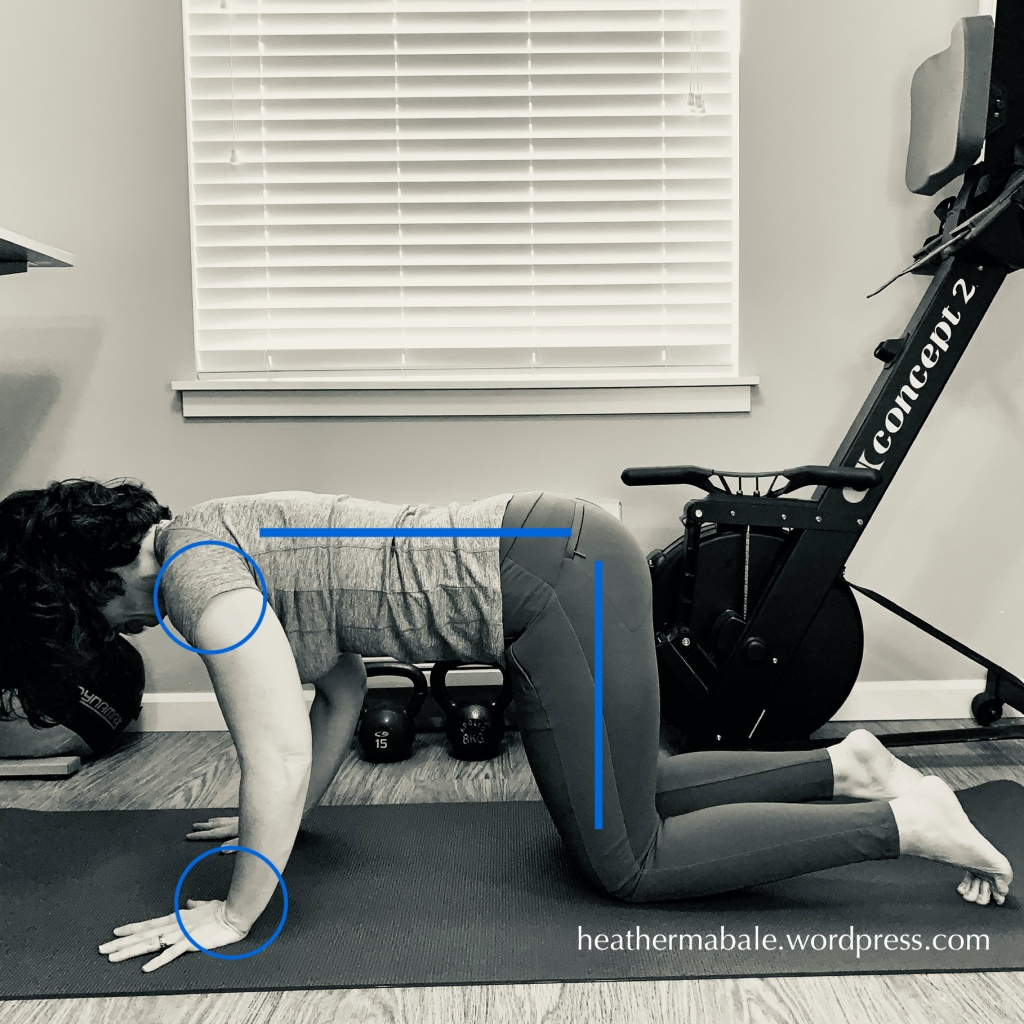
correct position for deep abdominal core exercise to provide joint pain relief
  1. Line up hips over knees and shoulders over wrists
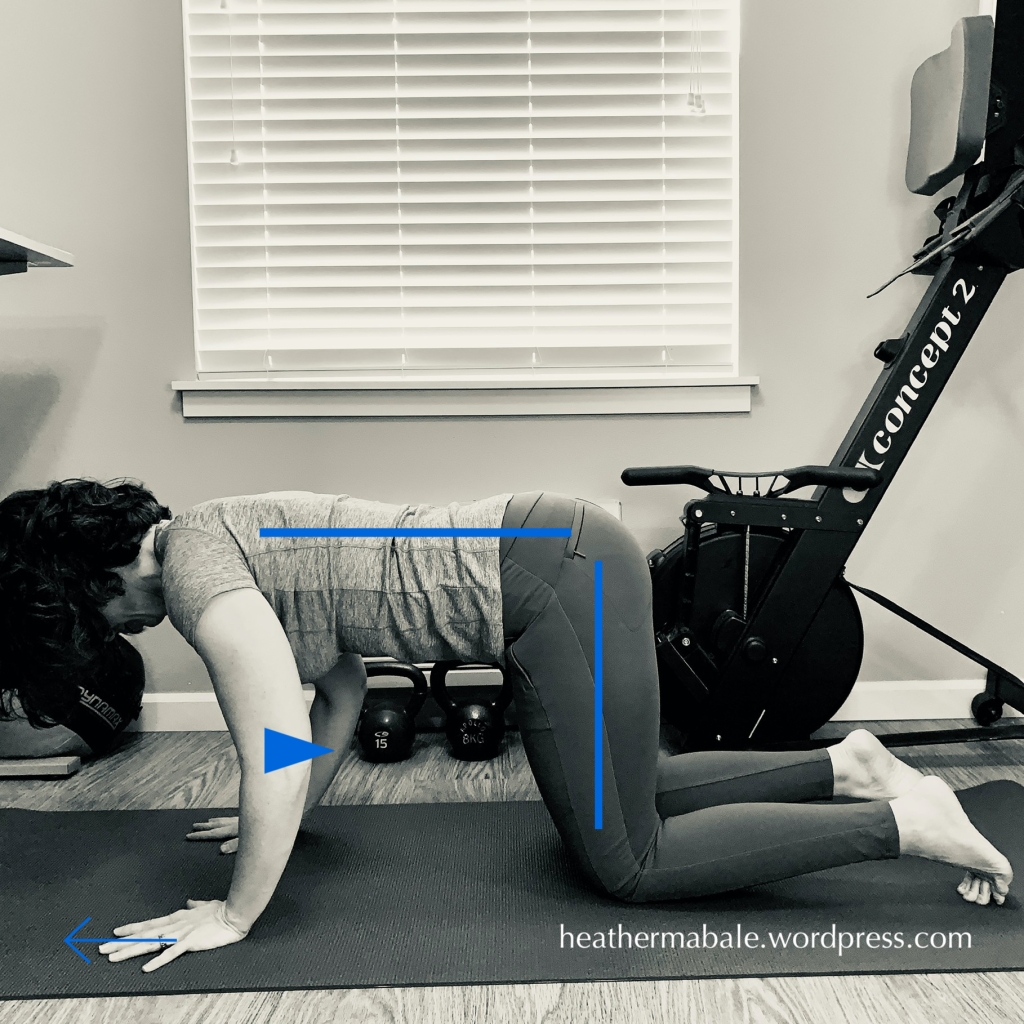
elbow, back and hip alignment for deep abdominal core exercise to provide joint pain relief

2. Fingers point straight ahead, hollows of elbows point forward (boney prominence of elbow points behind you). Bend elbows an inch or two to line up shoulders with your hip height (keep elbows tight by ribs).

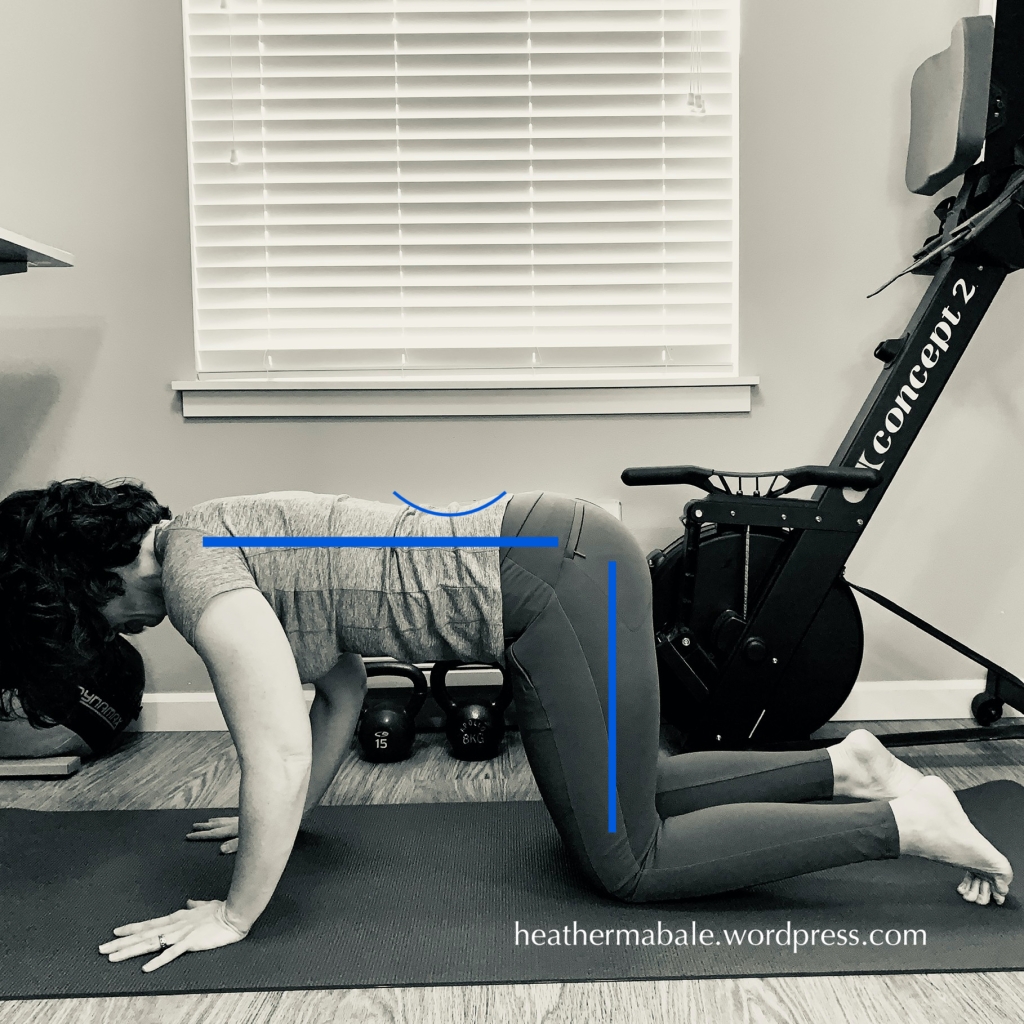
spine, hip and knee alignment with lumbar curve during deep abdominal exercise for joint pain relief

3. Keep lumbar curve (curve in small of back)

How to do the movement:

belly position releasing abdominals along with inhale during core exercise for joint pain relief
  1. Breathe deeply in and let stomach drop and relax. Breathe in and expand, relaxing abdominals.

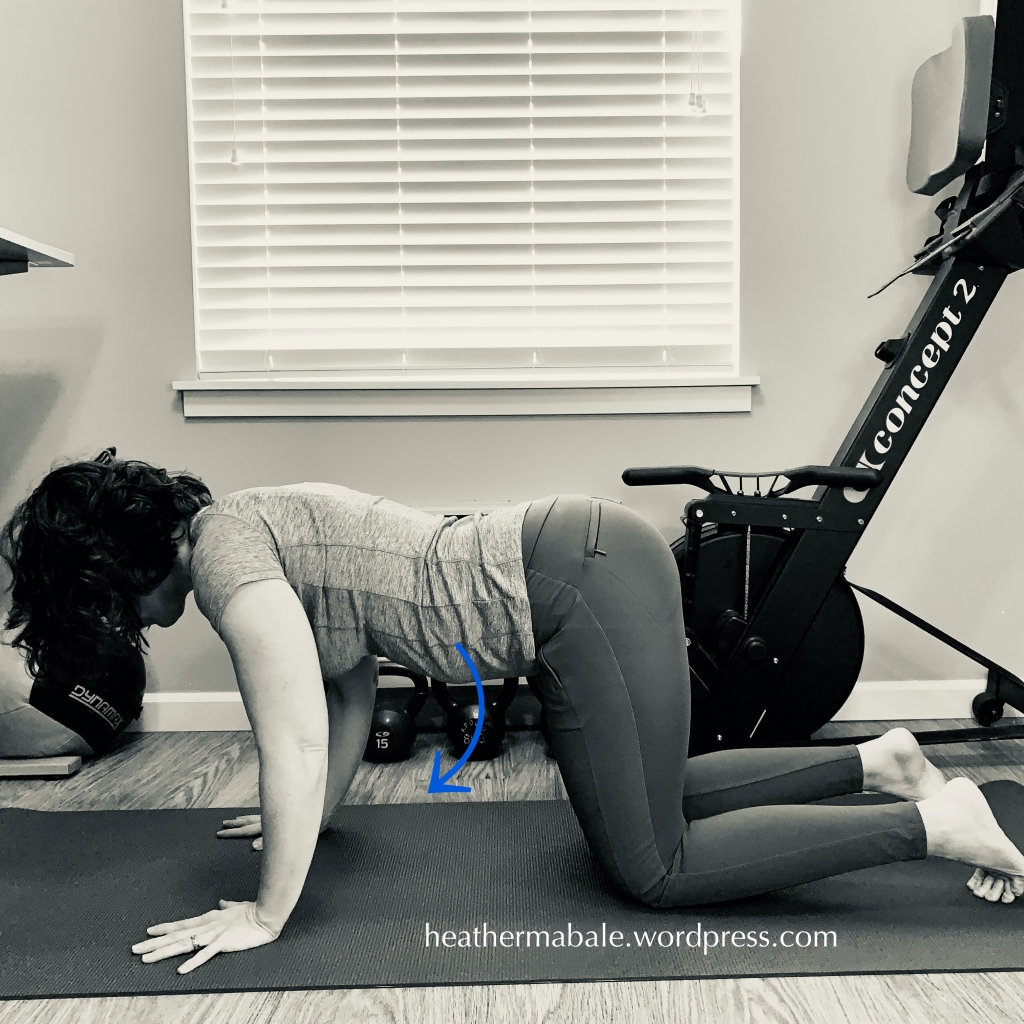
belly position drawing in belly button to spine activating abdominals during exhale to draw in deep abdominal transverse abdominis muscle during core exercise for joint pain relief

2. Exhale all of your breath out as you pull your belly button up to your spine. Hold belly in for a count of 10. Repeat 10 times.
Visualize that you shrink wrap your abs in tight as you exhale all your air. Make sure not arch your back like a cat and do not tuck your tailbone under as you exhale out. You should keep your lumbar curve in place. You only want your deep layer of abdominals working you are not moving your pelvis or spine.

I often find with my clients that upper body strength is the limiting factor when they first start this exercise. If you need to then do it for 30 seconds at a time and build up to a full minute. Make sure not to sink into your shoulders as you get tired.

This exercise will provide direct relief after a couple days of doing a set every single day. Work up to doing 3 sets of 10, holding for a count of 10 on each repetition.

“You can’t shoot a cannon out of a canoe.”
Paul Chek

WHY:
The center of the issue, the root of the matter, lies in the core. Do this easy exercise to strengthen your inner deep abdominal muscles that hold you upright. They support everything you do. The forces of mixing dough, shifting your weight, standing for hours on a hard floor get transferred to sensitive joints if the core does not give you a stable platform to work off of. As famously said by Paul Chek — the founder of the functional coaching program the CHEK Institute which I first trained under — “You can’t shoot a cannon out of a canoe.”

Essentially, if you do not have enough strength in your trunk to support lifting your limbs (arms and legs) then the forces (friction, gravity, shear etc.) will directly cause pain in your hips, back, knees and/or neck from poor motion. Therefore, start with this exercise for immediate results. I will introduce next steps for each joint in the following posts.

How do I setup for online training? What if I’ve never Zoomed?

Making the transition to online sessions is easier than you might think. Most of us have already been initiated into some type of video chat such as FaceTime or Skype. Now in our post-Covid world many of us have become rapidly familiar with remote meeting platforms like Zoom or Google Meetup. But if you are still new there are a few key set up tips that will help make your first session go smoothly.

Practice makes perfect — Download the application or access it online and practice. You can “join a meeting” with just yourself or a friend to see what it looks like.

Good lighting — ensure there is plenty of light so your exercise movements are easily visible. It’s also important that you are not back lit.

Full body view — check that you can be seen during standing and floor exercises.

Gear — have all of your equipment within reach. You will receive a list of required tools, such as yoga block and exercise band. You will want to have those at the ready.

Just hanging out

Currently, most of us are home a lot. Just hanging out. So why not actually hang? If you’re a fitness enthusiast you might do a lot of shoulder presses, handstands etc. but you might not hang very much. And now that we’re all in quarantine we definitely have the need and desire to add in new movement.

Hanging is the only time you’re not compressing and loading your shoulders with weight. As biomechanist Katy Bowman would say, it’s a nutritious movement that you need for shoulder health. For many people, that range of shoulder movement is missing (certainly in daily life but very likely in workouts as well). And it may be a big part of the reason you have shoulder pain.

WHY:

Hanging from a bar helps decompress your spine and it also helps aid mobility in the shoulder girdle. If you are having issues with shoulder impingement, or just general tightness this might be the thing to get you back to a more comfortable range of motion.

Benefits of hanging:

  • Stretches the chest muscles in another angle
  • Stretches the latissimus dorsi
  • Helps mobilize the shoulder capsule
  • Decompresses the shoulder joint and spine
  • Improves grip strength (An indicator of health according to this, and this)

HOW:

Make sure you start slow. Grab on to the side of a doorway and hang your weight off your arm.  Let your body be your guide. Stretchy-ness or discomfort is ok but pain is never ok. If you have hyperkyphosis (rounded back) you will not be able to reach over head and will need to start by pulling from the side (like on the side of a squat rack or TRX strap). It’s important to increase the angle gradually. Get creative as you work in new angles for your shoulder. Maybe use a workout band around a door knob and try it seated or laying down as you let it stretch your arm overhead. When you are ready, test out hanging with both feet on the ground and gradually work up to hanging without support.

Keep in mind this isn’t the full story. As your grip strengthens and mobility increases you’ll also have to work on scapular retraction and strength. Basically, try to work to an active hang and keep your shoulders out of your ears by depressing them downward. For now, this is intended as a stretch.

Key Points:

  • Be sure to foam roll, stretch and warm up first.
  • Start slow and experiment with feet supported lightly on the ground as you hang. You may need to start from the side and gradually move upward inch by inch.
  • Try 5-10 seconds at a time and increase from there. Eventually work up to 5 minutes of hanging spaced throughout the day.
  • Expect that this process will take several months or more. It greatly depends on the severity of your issue but it will certainly make a positive difference. Remember it took years for your shoulders to get as tight as they are now.

DO:

Using a doorway pull up bar, TRX straps or some other contraption, test out hanging for 5-10 seconds and start to increase from there. That might even feel like a lot. As your shoulders get acclimated you’ll want to increase to hanging throughout the day to an accumulated time of 2 -5 minutes.

With all of that said, Step 1: Just hang.


Sources

Katy Bowman Alignment Matters

Anatomy of Movement by Blandine Calais-Germain

Becoming a Supple Leopard by Kelly Starett with Glen Cordoza

Massage: The Mechanics of Knots Part 2

pexels-photo-96081.jpegWhat is an overactive muscle and why is it like that?

An overactive muscle just won’t turn off. It stays contracted and feels “tight.” A common cause of an overactive or hypertonic ( too much tone) muscle is the nervous system over recruits that muscle due to ingrained faulty motor patterns that have set in over the years. A motor pattern is a sequence of muscle movements such as your stride when you walk, or lowering into a squat. These “unhelpful” motor patterns often come from weaknesses in posture, too much sitting and the like. For example, you sit at work so the gluteal muscles are not working, the core is not working and so you learn to only use your back and hip flexor muscles to hold you upright. Why is this a “faulty pattern”? Well, you are not as strong or stable lacking glute and core strength. In this common scenario the hip flexors become overactive causing hip and low back pain.

How does massage help?

Physically applying pressure to a muscle can quiet an overactive or “tight” muscle into relaxing. There are actually mechanoreceptors (a sense organ or cell that responds to mechanical stimuli such as touch) located in muscle and joint tissue. Examples of these mechanoreceptors are muscle spindle cells and golgi tendon organs that sense stretch and tension. The sensory information of pressure from massage sends a signal from these mechanoreceptors through the nervous system to your brain to inhibit the muscle contraction. There is a law of neurology called the Arndt-Schulz Law, which states weak stimuli activate physiologic processes and very strong stimuli inhibit them. Therefore, gentler massage work can be done to stimulate and activate a muscle where as deeper techniques can be done to inhibit a muscle.

The appropriate technique and amount of pressure can send opposite neurological signals in order to counterbalance an unhealthy pattern of tension and help the body normalize into healthier muscle tone and range of motion.

Relate this back to the example of sitting too much at work. Too much sitting causes a lack of glute strength and tight hip flexors so a therapist would use deep work to inhibit the hip flexors and more stimulating techniques to activate the gluteal muscles. All with the intent to not just physically work through tight knots (stuck connective tissue) but to help the nervous system balance muscle tone in the body. 

Quick Tip: How to get the most from your stretching

Most of us don’t stretch enough. So here’s a quick tip to get more out of it.

Contract-Relax

  1. Using 10-15% of your strength, contact your muscle and hold for 10 seconds.
  2. Then relax and ease into the stretch a little bit further. Hold.
  3. At the new bit of length you’ve just eased into, repeat the contraction (10-15% strength) and ease in just a tiny bit further.
  4. Repeat one last time at the new depth. Hold in your core for support as you ease out of the stretch.

Example Hamstring Stretch:

  • While standing, place your heel on a step or chair. Ensure the height is not too challenging for your current flexibility.
  • Press your heel down for 10 seconds.
  • Keep your back straight and lean forward towards your toes. If it’s just an inch that’s ok.

Remember: Keep the stretch relatively comfortable. Don’t push too far or your muscle will lock up on you and you’ve gained nothing.

This technique can be done on most any area. Try the pecs too. Happy stretching!

How massage works: The mechanics of knots

How does massage work? Is it really just breaking up knots? 

Yes, simplistically speaking, when looking at bones and muscles as a system of levers and pulleys. Massage mechanically un-tangles stuck tissues (fascia, muscle, tendon) and can help relieve compression on a “pinched” nerve or mobilize a tight joint capsule. It becomes more complex when you look at how that in turn affects the nervous system and the cascade of responses in the body that follow. But first, what is a knot?

back muscle-pexels

What is a knot anyway?

Massage and physical therapists often refer to a knot as an “adhesion.” When injury occurs the body repairs the injured tissue with building blocks such as collagen, elastin and fibronectin. (Whether the damage happens over time from the wear and tear of angrily sitting in your car two hours every day or quickly from spraining your ankle.) These building blocks are pretty sticky and fibrous so they often get a bit stuck together. Adhesiveness is the property of sticking together, hence, a “knot” is called an adhesion.

If you were wondering, yes there is a difference in the density, texture etc. of an adhesion based on how long it took to form and other factors. A tight muscle may not always be tight from a knot; but we’ll get to that later.

The soft tissues in the body are composed of proteins and fluids that are more like gels (technically they are colloids), which means they are viscous and elastic. This makes tendon, muscle and fascia malleable and influenced by mechanical force (examples include tension, torsion and compression).

Since the soft tissues in the body respond to mechanical force, massage therapists apply tension, compression and such to “unstick” adhesions. The skill is to effectively pinpoint the affected area and use appropriate methods so as not to cause too much pain and more damage. By teasing and coaxing away the stuck layers from each other the body can repair itself in a more organized fashion. The goal is to get movement between muscle, facia and other tissues so the layers slide easily on top of one another avoiding more adhesions. Fluid content in a muscle also determines the density and pliability of that muscle. Manipulating and stretching tissues also affects the veins and capillaries which helps circulate blood in and out of the area. When a therapist applies traction to a joint it encourages the flow of synovial fluid. Sticking with our analogy….keeping you like a well oiled machine.

As I mentioned, muscle is not always tight because of a “knot.” Those tense, ropey cords of muscle can actually be due to an overactive or hypertonic muscle. 

But what exactly is an overactive muscle? How and why does that happen? It’s all in the mind so to speak. This is when the nervous system gets involved. In fact, there are actually receptors at the cellular level in muscles and veins that communicate with the nervous system. Let’s save that for Part 2. 

Sources

Mosby’s Fundamentals of Therapeutic Massage Sixth Edition by Sandy Fritz

Cortisol decreases and serotonin and dopamine increase following massage therapy. Conducted by Touch Research Institutes, University of Miami School of Medicine, Miami, Florida. 

A preliminary study of the effects of a single session of Swedish massage on hypothalamic-pituitary-adrenal and immune function in normal individuals. conducted by Department of Psychiatry and Behavioral Neurosciences, Cedars-Sinai Medical Center.


My favorite calf stretch

Improve balance, posture, reduce knee pain and more just by stretching your calves.

WHY: The calf stretch is easy to incorporate throughout your day and will give you huge benefit. Tight calves are so important to address because they affect your walking gait as well as squat position. Calves (made up of the Soleus muscle and Gastrocnemius muscle) and hamstrings share connective tissue and have close attachment sites at the knee so you will probably feel the stretch run up through the hamstrings as well. More bang for your buck.

HOW: This stretch can be done with a half dome foam roller, rolled up towel, yoga mat or the foot of a squat rack to give you a few ideas. Post heel on roller/towel etc. and step through to deepen the stretch. Experiment with stepping through, as I did in the image, or placing your feet side by side.

Make sure to stand tall in order to get the most out of the stretch. This walk through is helpful in that you are keeping your hips level. You may notice it even requires a bit of balance so you need to fire your abdominals.

DO: Stretch calves daily and even multiple times a day. (Come on it’s an easy one)
Hold for a minimum of 30 secs per side. Keep a timer or count slowly to 30 because guaranteed you will do it for 7 secs and think it feels like 30 (or is that just me).